Collect feedback, prioritize with votes, auto-sync your roadmap, and keep users engaged automatically
UserJot is the complete feedback platform for SaaS teams. Beautiful feedback boards that organize ideas, roadmaps that sync automatically, changelogs that write themselves, and engagement loops that run themselves.
Free forever30-second setupUnlimited users
Your users are telling you what to build.
Are you listening?
Teams using UserJot see 40% more feedback submissions because users finally have a place where their voice matters. No more scattered emails, lost Slack messages, or ignored feature requests.
200+ votes on one idea
See what users really want, not just who shouts loudest
10% lower churn
Users stay when they see you building their requests
5 hours/week saved
Stop managing feedback in spreadsheets and emails
Entire team aligned
Everyone sees the same priorities, no more debates
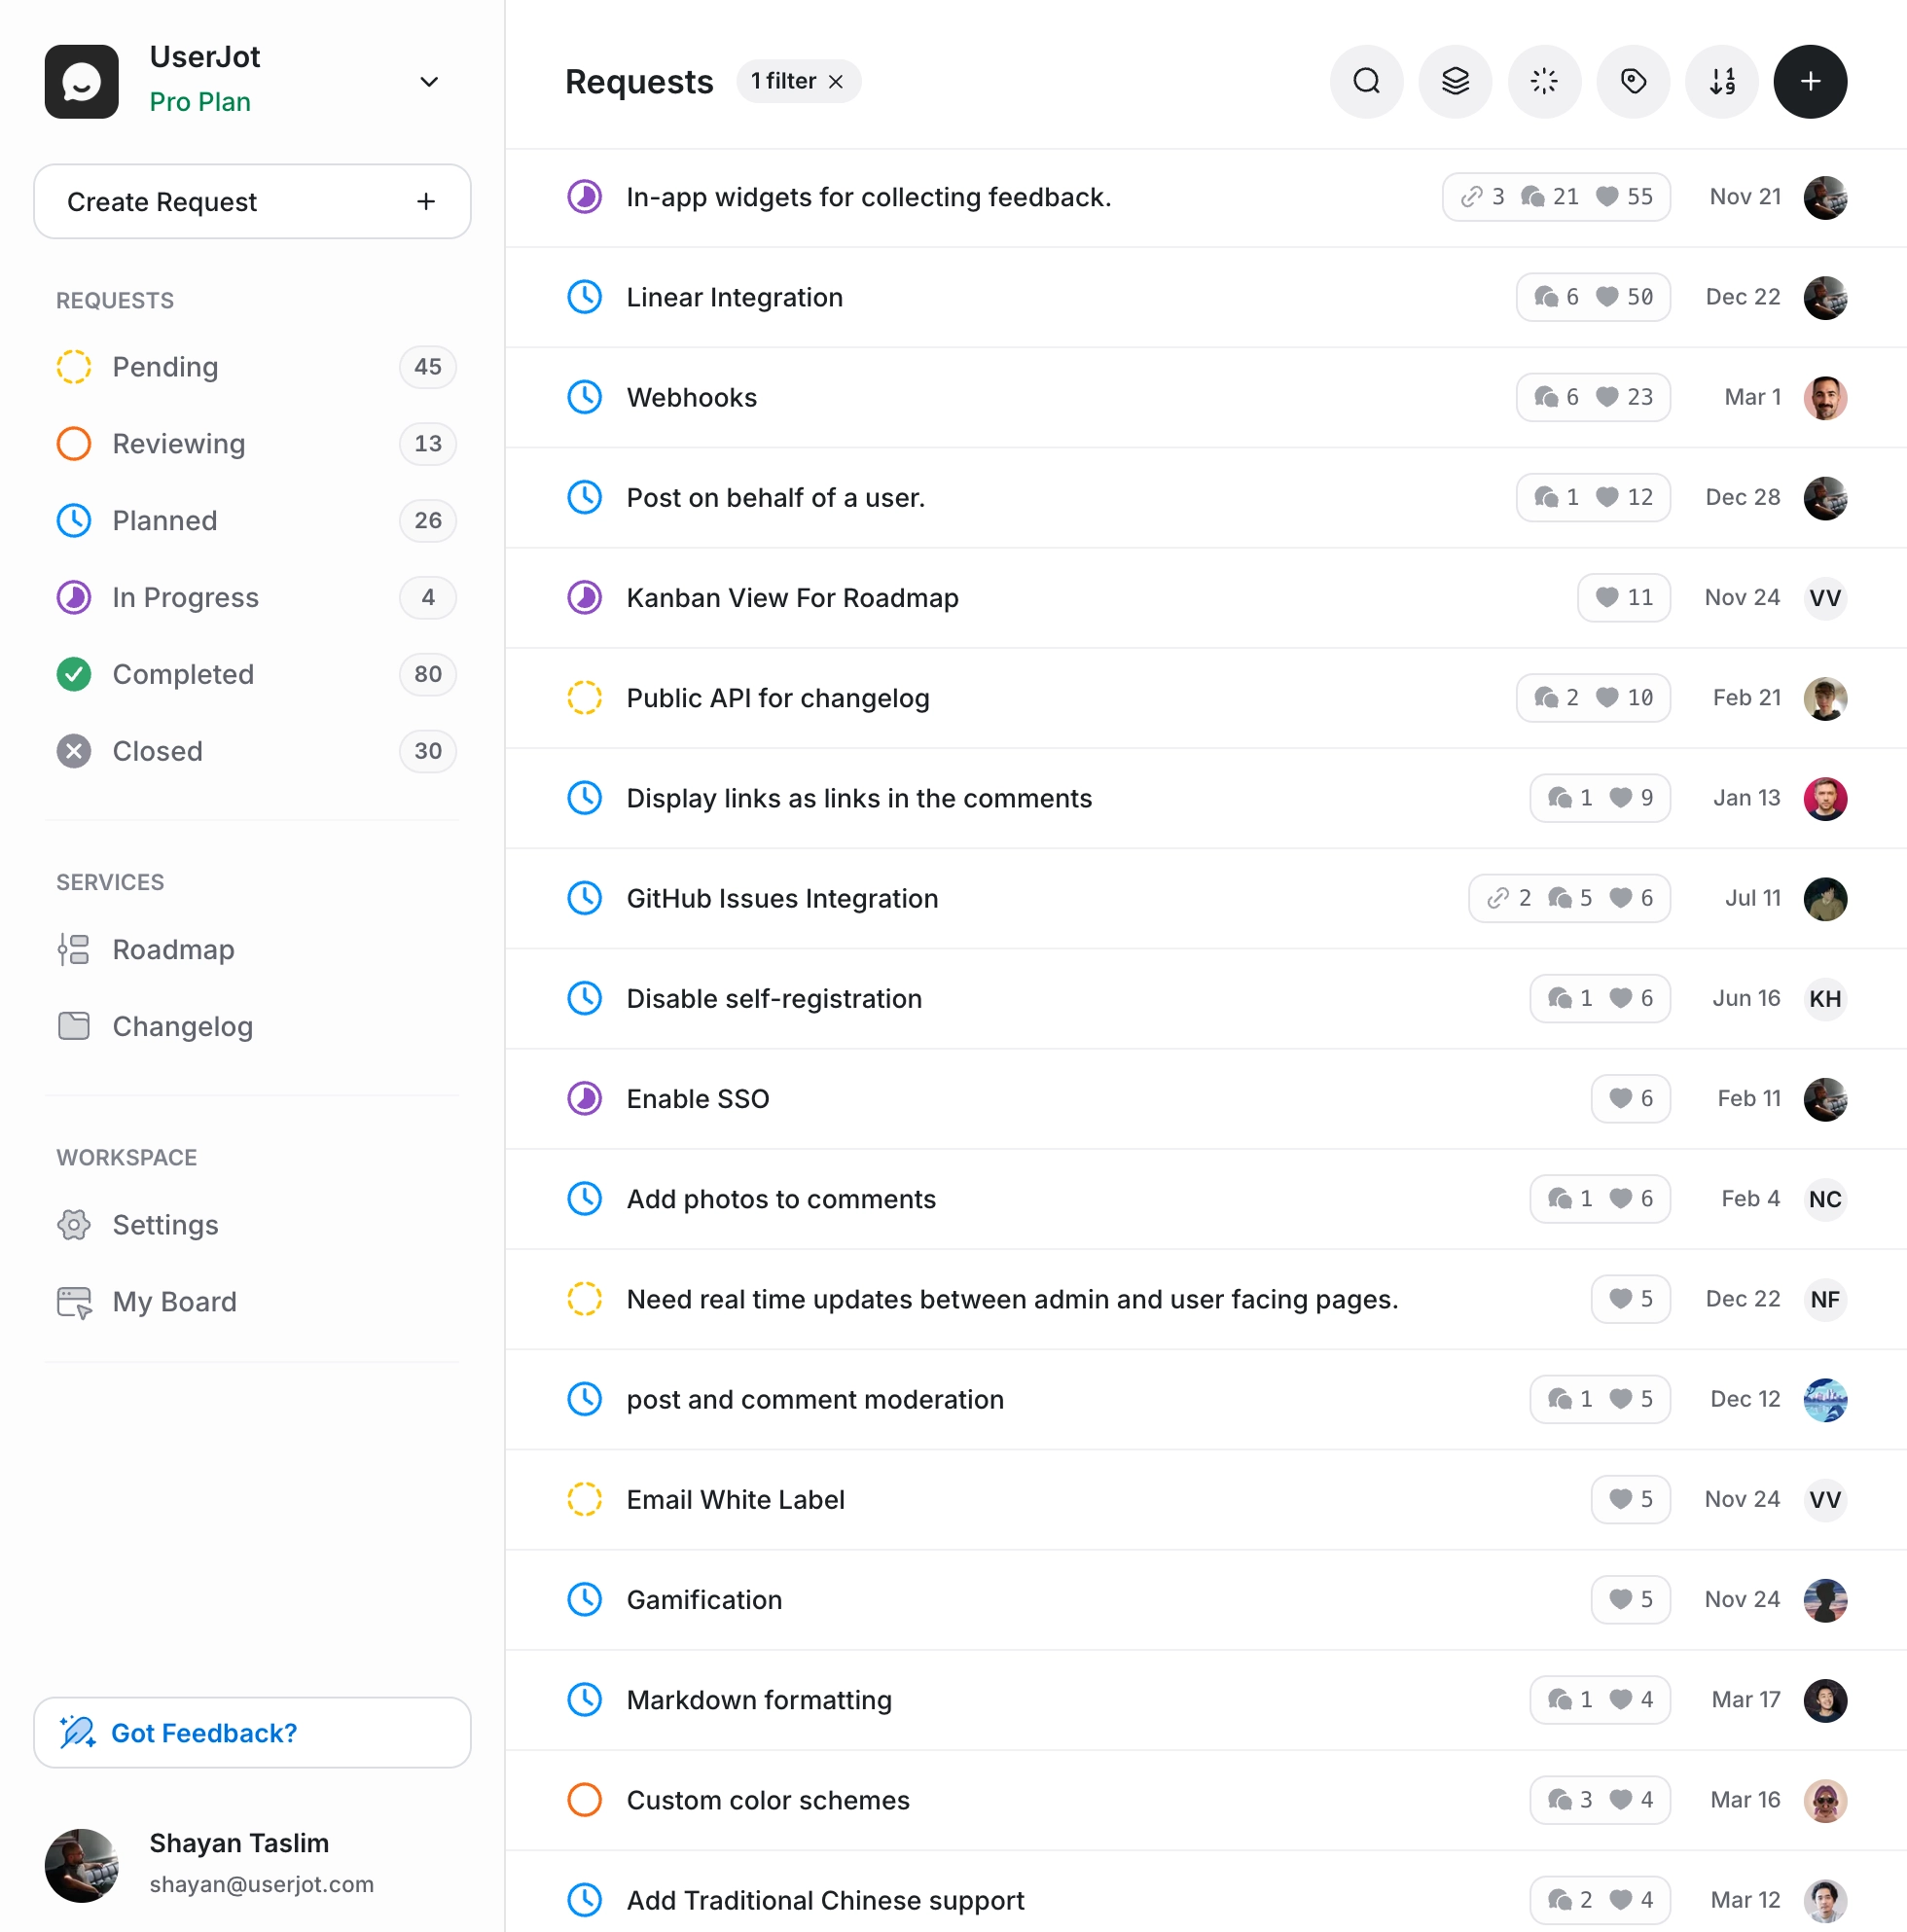
Beautiful feedback boards
where great ideas are born
Give your users a dedicated space to share ideas, vote on features they want, and see what you're building. Our AI-powered boards organize feedback automatically, detect duplicates, and help you discover what really matters to your customers.
Upvoting & reactions
Users vote on what they want, best ideas rise to the top
AI duplicate detection
Shows similar ideas as users type, consolidating votes
Auto-categorization
AI automatically tags and organizes by feature area
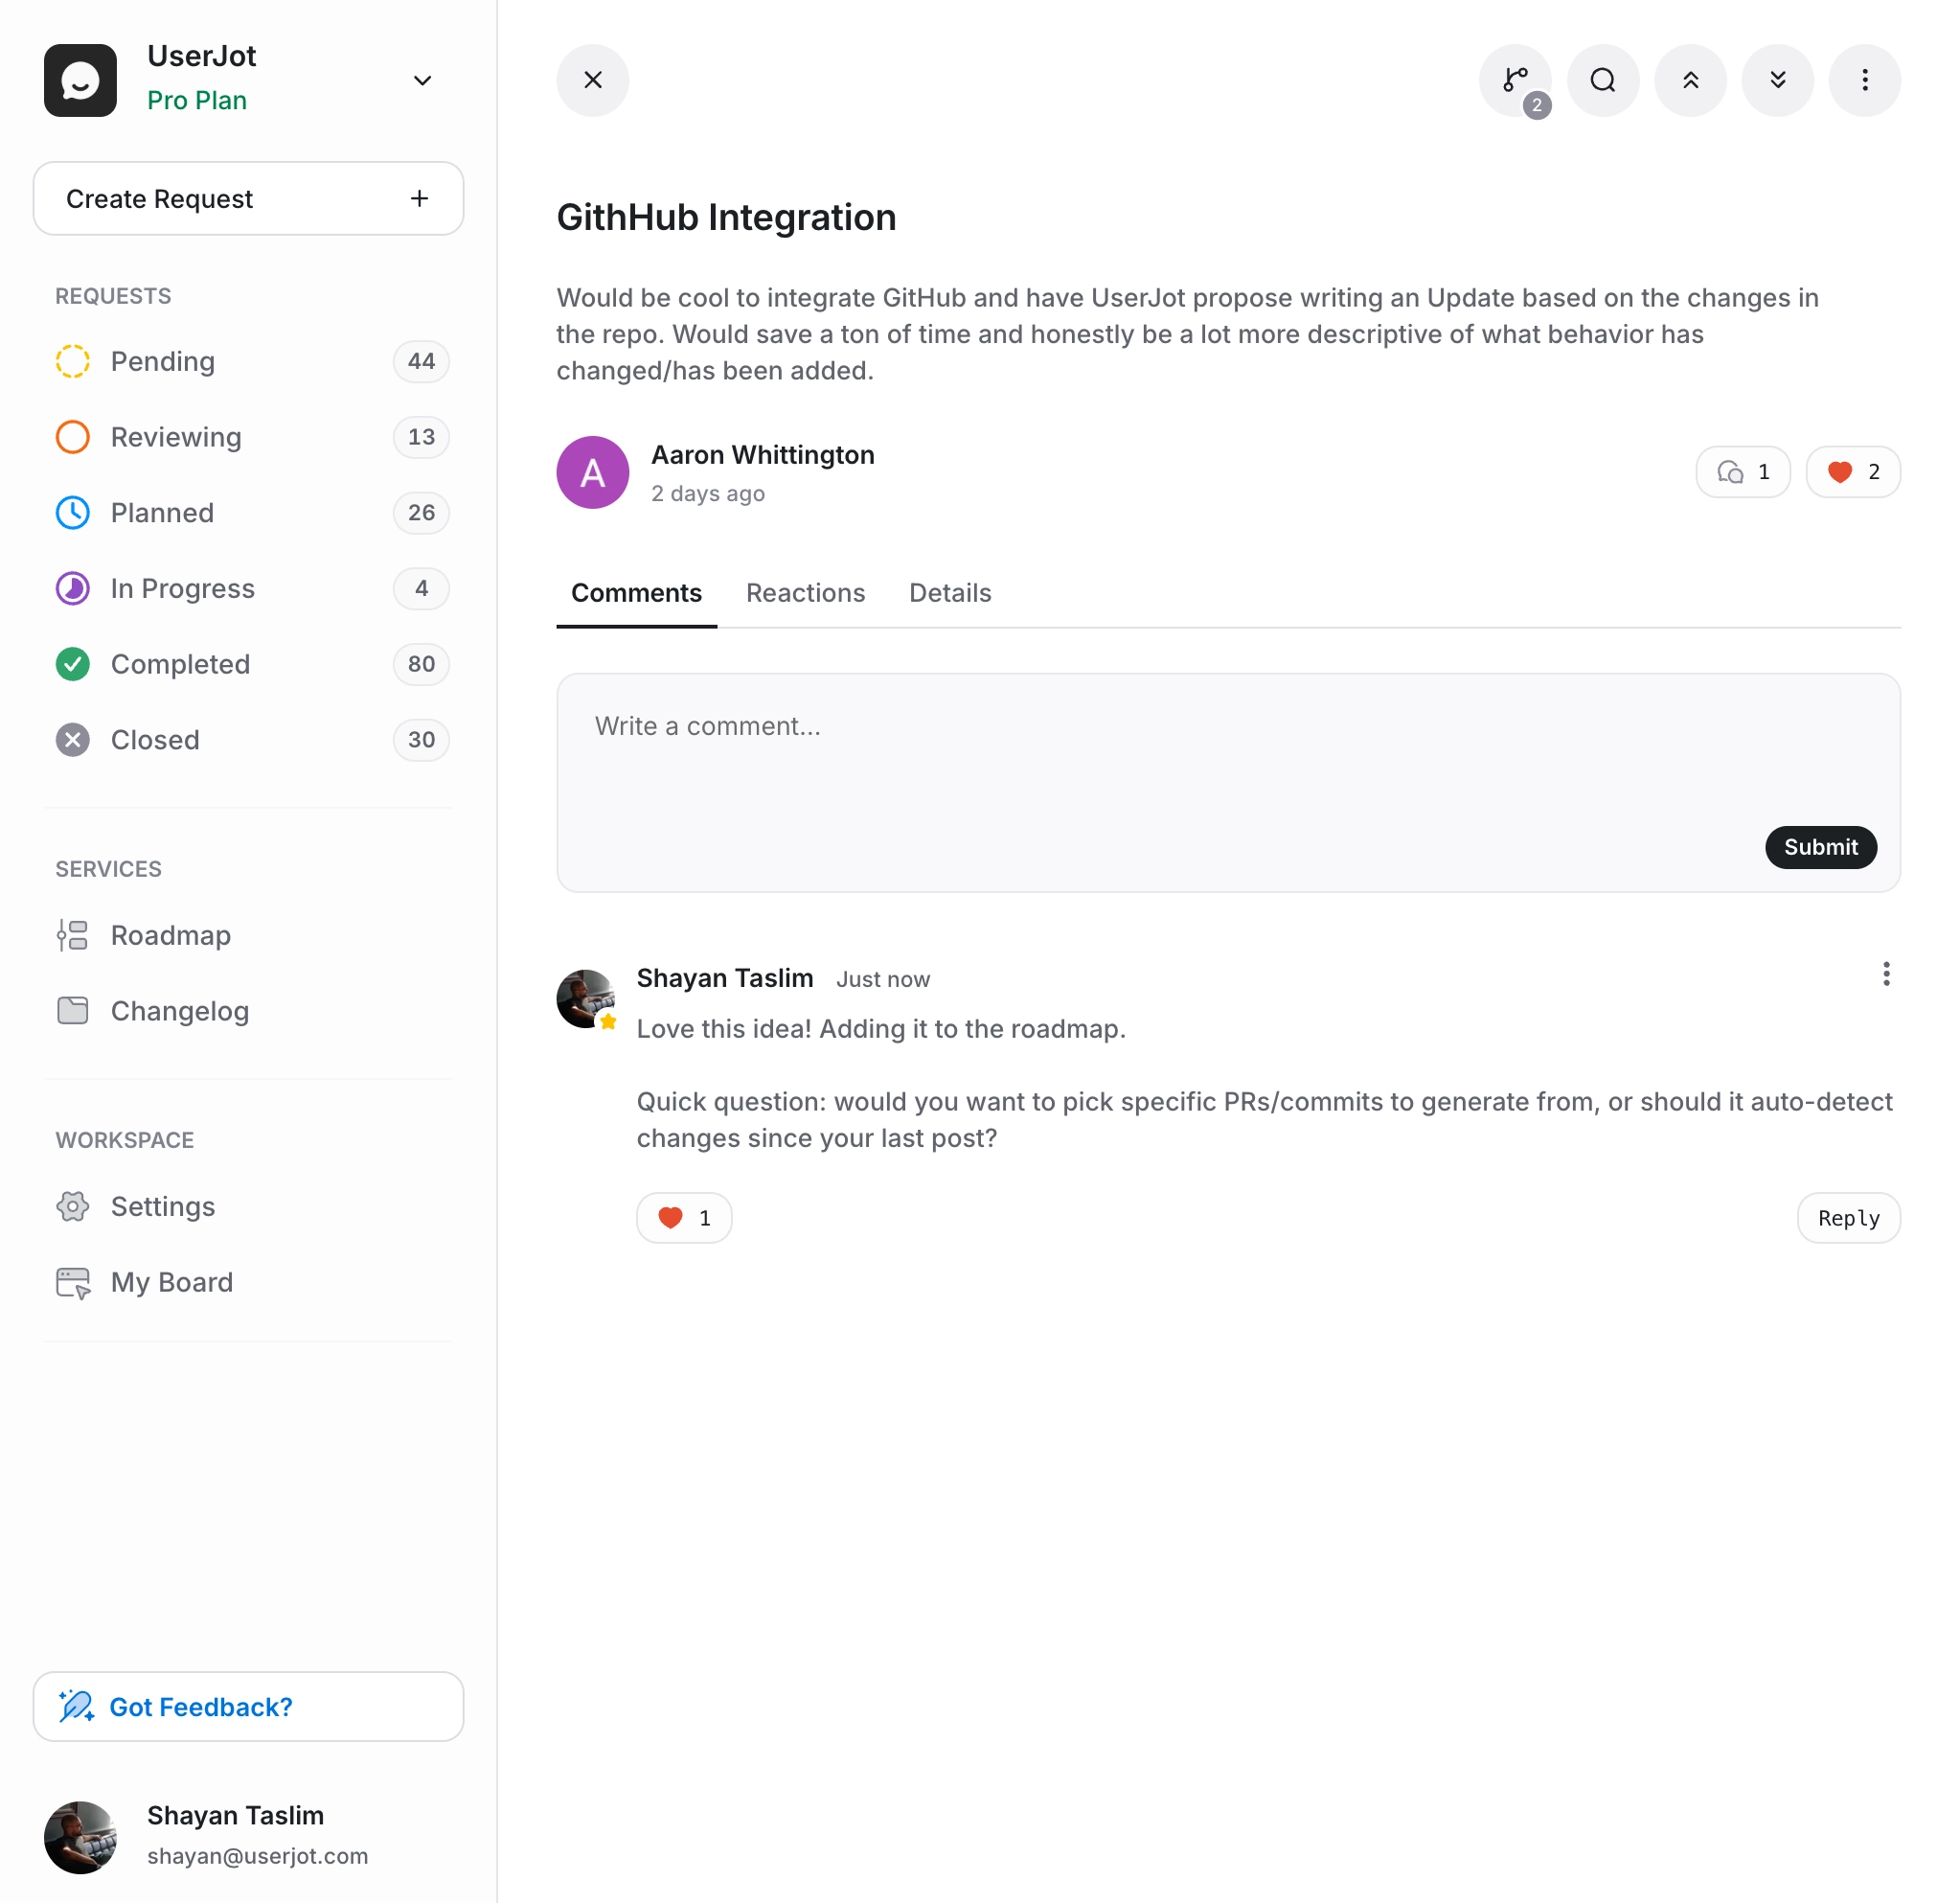
Discussion threads
Users discuss ideas, add context, and refine together
Guest & anonymous
Let anyone submit feedback without creating an account
Private boards
Create internal boards for sensitive customer feedback
Powerful search
Semantic search finds ideas even with different wording
In-app widget
Embed feedback collection directly in your product
A product roadmap that
updates itself automatically
Never update a spreadsheet again. Change feedback status → roadmap reflects it instantly. Show users what's coming and keep them engaged.
Status-based updates
Roadmap auto-syncs when feedback status changes
Vote visibility
Shows which features have the most customer demand
Progress notifications
Email users when feedback moves between statuses
In-app roadmap
Embed in your app to reduce "when will this ship?" tickets
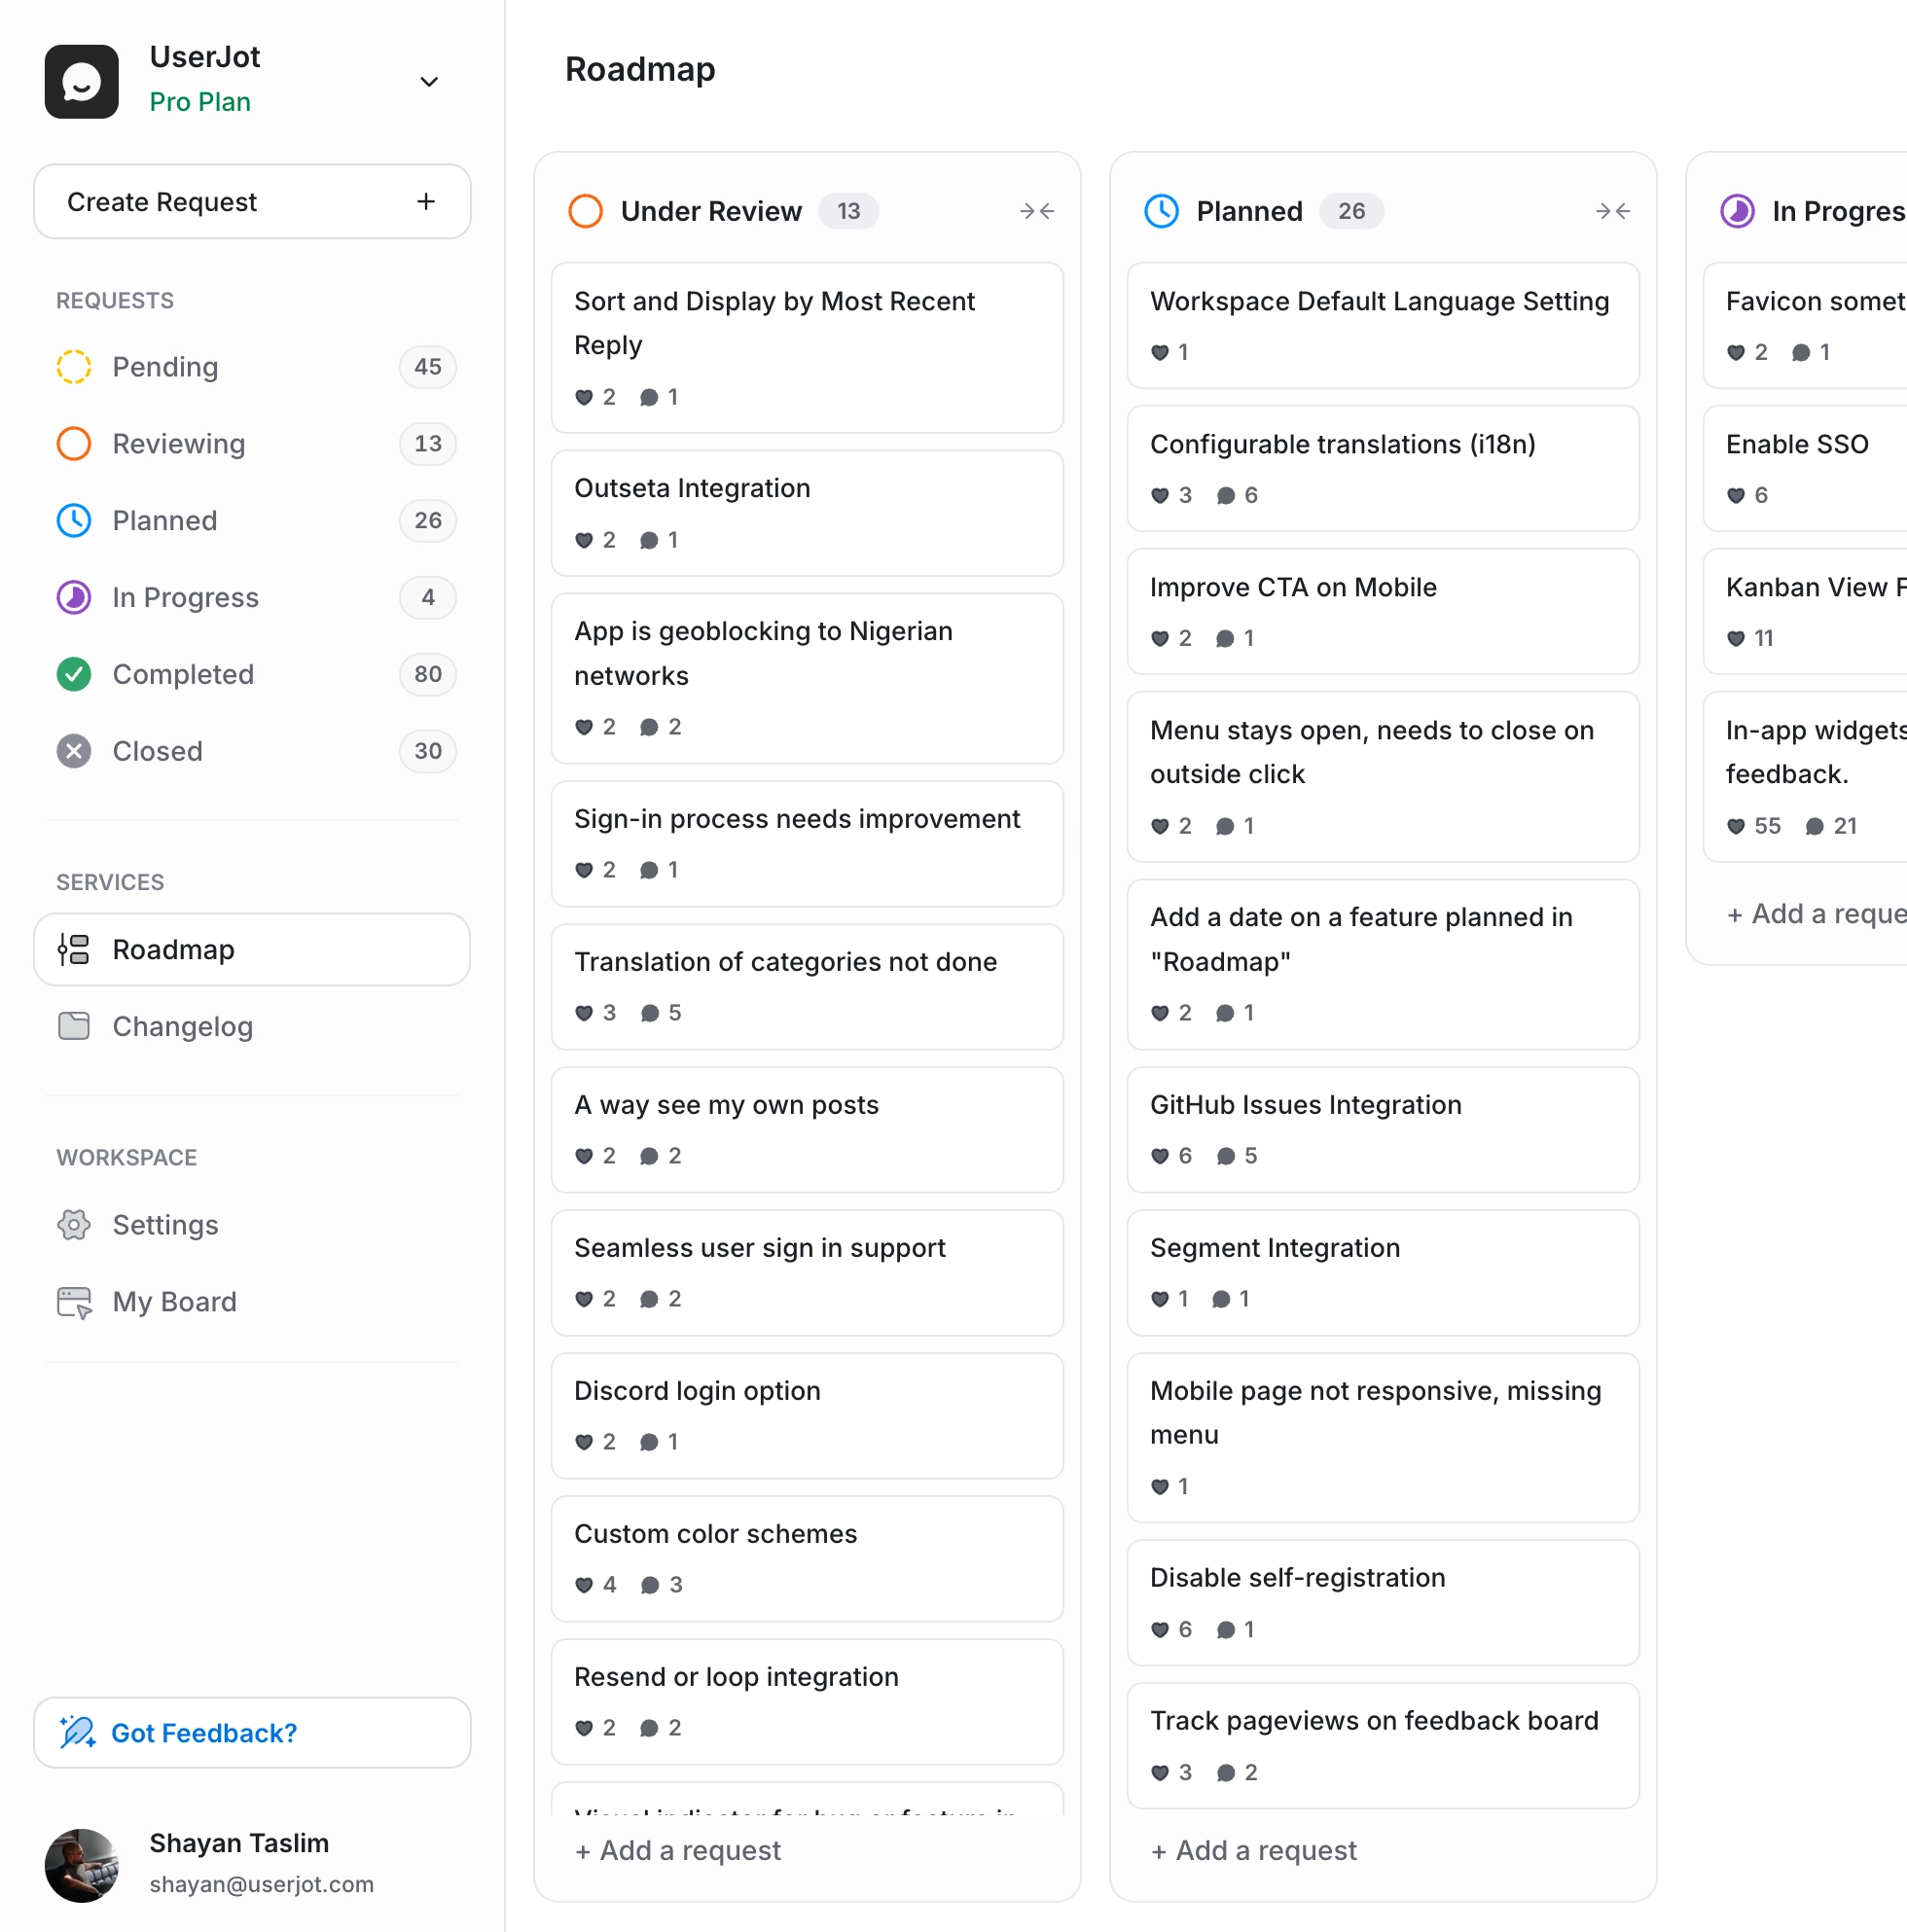
Your roadmap becomes a living document that builds trust. Users see you're actively working on their requests, reducing churn and increasing engagement.
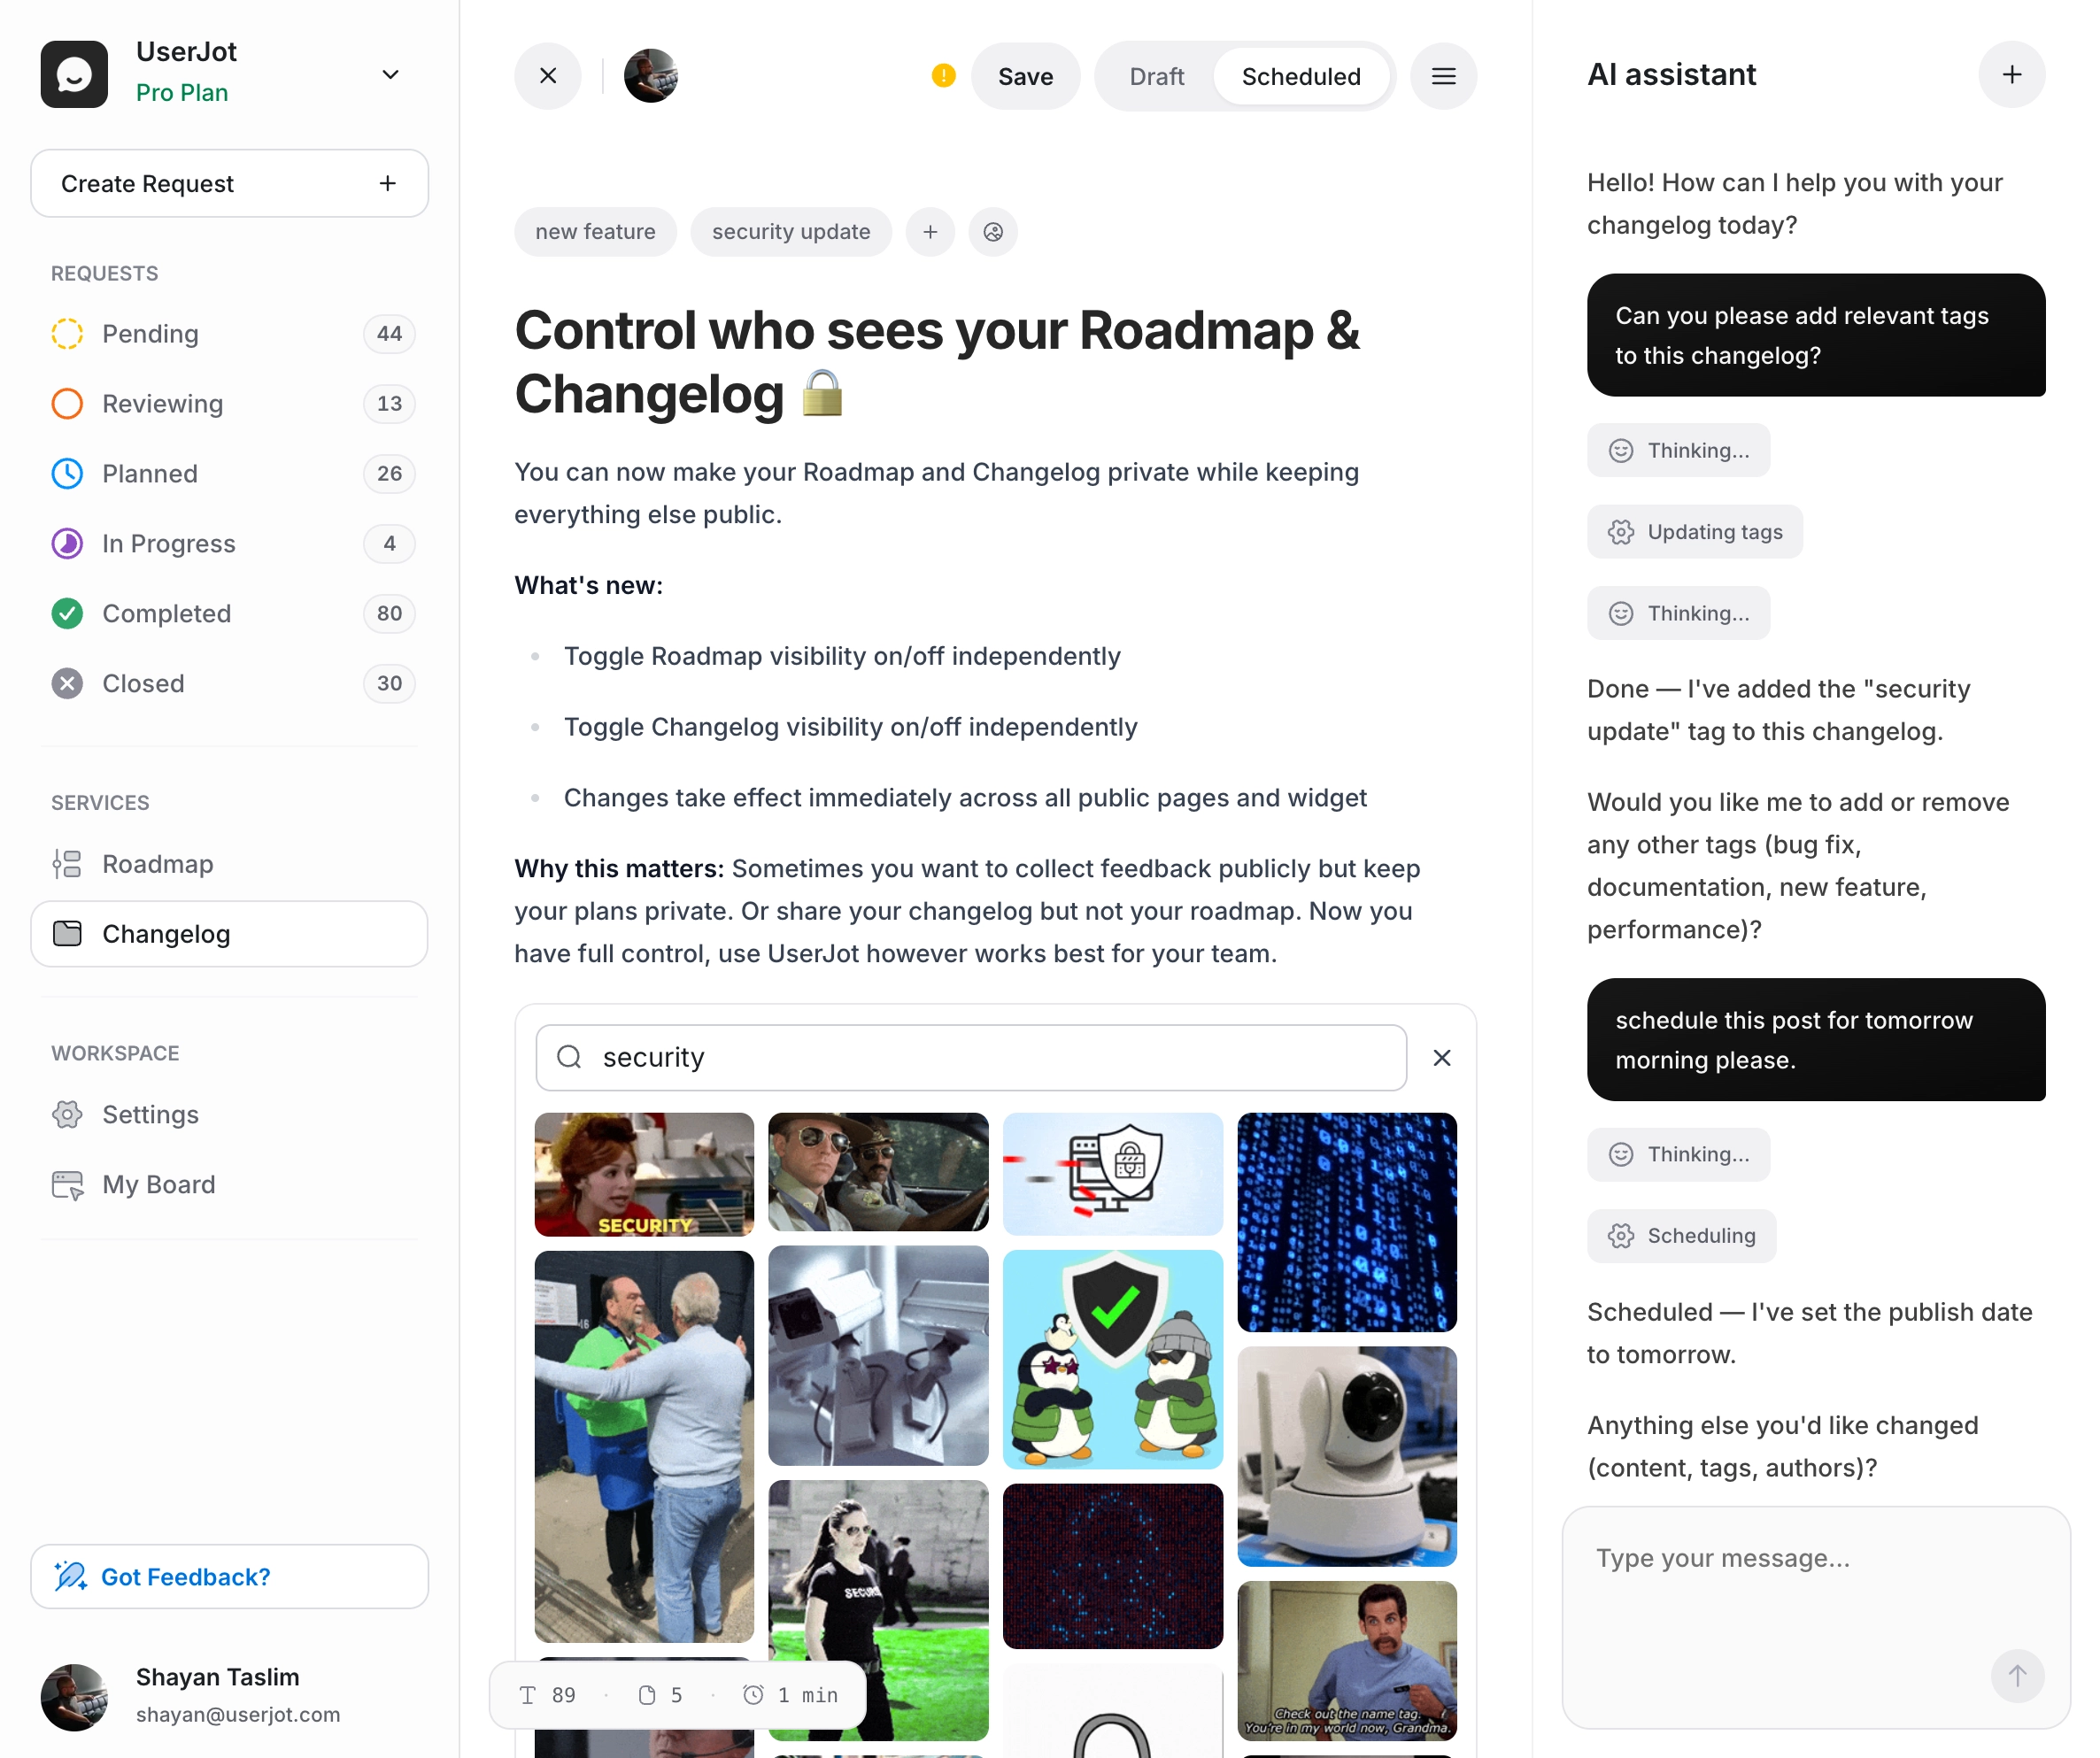
AI-powered changelog that
writes, schedules, and notifies
The most advanced changelog tool: AI writes your posts, pulls in shipped feedback, and notifies the right users automatically. Collaborate with your team and keep customers engaged—no manual work.
AI writes everything
Writes posts, generates titles, tags, and schedules publishing
Auto-pull feedback
AI surfaces closed feedback and writes changelog entries
Smart notifications
Auto-email everyone who voted on shipped features
In-app changelog
New update indicator appears in widget when you publish
Collect feedback
wherever your users are
Standalone feedback portal
Embedded widget for your app
The engagement engine that
runs on autopilot
UserJot doesn't just collect feedback—it creates an engagement loop that keeps users coming back. All automated, no work required.
Instant notifications
When someone upvotes or comments on their idea. Users see that others care about their suggestions, keeping them engaged with your product.
Status updates
When their request moves to "Planned" or "In Progress". They see you're actively working on what they asked for, building trust and reducing churn.
Weekly digests
Top new ideas to vote on each week. Keeps users checking back regularly even when they're not actively using your product.
Launch alerts
When you ship what they asked for. The moment that turns satisfied users into champions who tell others about your product.
Users check back 4x more often. They submit more ideas. All emails are beautifully designed by us. You don't set up anything. Just turn it on and watch engagement soar.
Built for modern SaaS teams,
not enterprise committees
We built UserJot because existing tools are either too expensive, too ugly, or too complicated. Usually all three.
| Feature | UserJot | Canny & Others |
|---|---|---|
| Pricing model | Unlimited users, all plans | $79+/mo for 100 users |
| Setup time | 30 seconds | Days of configuration |
| Design quality | Beautiful, modern UI | Dated, corporate feel |
| Free tier | Forever, core features | 14-day trial |
| Feedback → Roadmap | Automatic sync | Manual updates |
| Changelog included | Separate tool needed | |
| Email automation | Built-in, designed | DIY or basic |
| AI features | Duplicate detection, tagging | Limited or none |
| Target market | Modern SaaS teams | Enterprise focus |
Up and running
in 30 seconds
Create workspace
Sign up with just an email. Pick a name. That's it. No credit card, no sales call, no 47-field form.
Add to your app
Copy one line of code for the widget, or just share your board link. Both work instantly.
Watch magic happen
Users start submitting. Votes pile up. You ship features. Users get notified. Churn drops.
Seriously, it's that simple. Our average customer is collecting feedback within 2 minutes of signing up.
Pricing that doesn't punish growth
Unlimited users on every plan. Because charging per user for a feedback tool is like charging per customer for a store. It's backwards.
Free
Free, forever.
What's included
- Unlimited Posts
- Unlimited Users
- 3 Admin Roles
- 2 Feedback Boards
- Roadmap
- Changelog
Starter
For small teams.
What's included
- Custom Domain
- Custom Branding
- Guest Posting
- 5 Feedback Boards
- Private Boards
- One Integration
Professional
For growing teams.
What's included
- Unlimited Boards
- Advanced Search
- Guest Posting
- Single Sign-On
- Unlimited Integrations
- Unlimited Admin Roles
Why so affordable? We're bootstrapped, not VC-funded. We answer to customers, not investors. This means we can offer fair pricing that grows with you, not against you.
Built by a team that gets it
UserJot is built by an indie SaaS founder who got tired of expensive, bloated feedback tools. We use UserJot to build UserJot. Every feature exists because we needed it.
Indie-friendly pricing
We know every dollar counts when you're bootstrapping
Design-obsessed
Beautiful software makes users want to participate
Ship fast philosophy
We ship updates weekly based on your feedback
Customer-funded
No VCs means we optimize for you, not an exit
Stop losing customers to silence
When users take time to share feedback, they're invested in your success. When you show them you're listening—really listening—they become your biggest champions. That's not just good product management. That's good business.
Free forever • No credit card • 30-second setup
Frequently asked questions
Everything you need to know about customer feedback management and how UserJot helps you build better products.
You can start collecting user feedback immediately after signing up. Our feedback management software requires no complicated setup.
Yes, UserJot offers extensive customization options to match your brand and improve your customer experience management.
UserJot's smart grouping and voting features help you easily prioritize user feedback, ensuring your product team always knows what to build next.
UserJot helps you prioritize user feedback by allowing users to vote on feature requests. You can quickly see which ideas have the most support, making it easy for your product team to decide what to build next.
Yes, UserJot helps reduce customer churn by showing your users that you value their input. By collecting user feedback, sharing a public roadmap, and posting product changelogs, you keep users engaged and demonstrate that you listen to their ideas.
Absolutely. UserJot is specifically designed as a customer feedback tool for SaaS companies. It helps SaaS product teams collect feedback, prioritize feature requests, and manage product roadmaps effectively.
Yes, UserJot includes built-in product roadmap software. Your roadmap automatically updates based on the status of user feedback, keeping your users informed about upcoming features and improvements.
Yes, UserJot provides easy-to-use feedback tracking features. You can organize, categorize, and track all user feedback in one place, ensuring nothing important gets lost.
Yes, UserJot makes it easy to create and share a product changelog. Every time you complete a feature request, you can automatically notify users through beautifully formatted changelog entries.
UserJot improves customer experience management by providing a central place for users to share feedback, see your roadmap, and follow product updates. This transparency keeps users engaged and satisfied with your product.
Yes. UserJot allows guest feedback submissions, making it easy for anonymous or first-time visitors to share valuable insights without creating an account.
Yes, UserJot offers extensive customization options, including custom branding, custom domains, and white-labeling. This helps you maintain a consistent brand experience for your users.
UserJot integrates seamlessly with many popular product management tools. You can connect UserJot with your existing workflow to easily manage user feedback, prioritize feature requests, and keep your team aligned.